
Putting up new curtains should not feel like a big project. Yet so many people get stuck trying to figure out where to start, how high to hang the rod, or why the folds never look quite right.
Grommet curtains are one of the easiest window treatments to hang at home.
The metal rings slide straight onto the rod, the folds fall into place on their own, and the whole thing comes together faster than you think.
This guide walks you through every step so you get it right the first time.
Let’s get started.
What Are Grommet Curtains?

Grommet curtains, also called eyelet curtains, have metal rings punched directly into the fabric at the top.
These rings slide onto the curtain rod, creating even, uniform folds that look neat and clean.
They are easy to open and close because they glide smoothly along the rod. The fabric hangs in soft, straight pleats without any extra clips or hooks needed.
They work well in living rooms, bedrooms, and dining areas. They suit most rod styles and give any window a finished, put-together appearance without much effort.
Tools and Materials Needed to Hang Grommet Curtains

Before you start, having the right tools makes the whole process quicker and easier. Here is everything you need to get the job done properly.
Essential Installation Tools:
- Drill
- Screwdriver
- Measuring tape
- Pencil
- Level
Curtain Hardware and Accessories:
- Curtain rod
- Wall brackets
- Screws
- Wall anchors
Optional Tools for a Professional Finish:
- Stud finder
- Spirit level
- Step ladder
- Rubber mallet
Step-by-Step Guide to Hanging Grommet Curtains
Hanging grommet curtains is simple. Follow these easy steps to get a clean, neat look on any window.
Step 1: Measure Your Windows Correctly

Getting the measurements right saves you from buying the wrong size curtains. Measure twice before purchasing anything.
Measure the window width and add 4 to 6 inches on each side for full coverage and a fuller look when closed.
Your rod should be 8 to 12 inches wider than the window frame to let curtains stack back when open.
For length, floor-length curtains work best in most rooms. Sill or apron length suits kitchens and bathrooms.
Step 2: Choose the Right Curtain Rod and Hardware

The right rod makes hanging easier and keeps your curtains looking good long term.
Standard, double, and tension rods all work with grommet curtains. Single rods are the most common and easiest to install.
Grommet rings usually fit rods between 1 and 1.5 inches thick. Always check the grommet size before buying a rod.
Place brackets no more than 30 to 36 inches apart. Add a center support bracket for wider windows to stop the rod from bending.
Step 3: Prepare Your Grommet Curtains Before Hanging

A little prep work before hanging gives you a much cleaner and neater result.
Steam iron the curtains to remove creases. Hang them while slightly damp for best results so the fabric falls smoothly.
If the curtains are too long, fold the hem and use fabric tape or stitch a new hem instead of cutting.
Check that all grommet rings sit evenly along the top and make sure none are loose or damaged before installation.
Step 4: Install the Curtain Rod
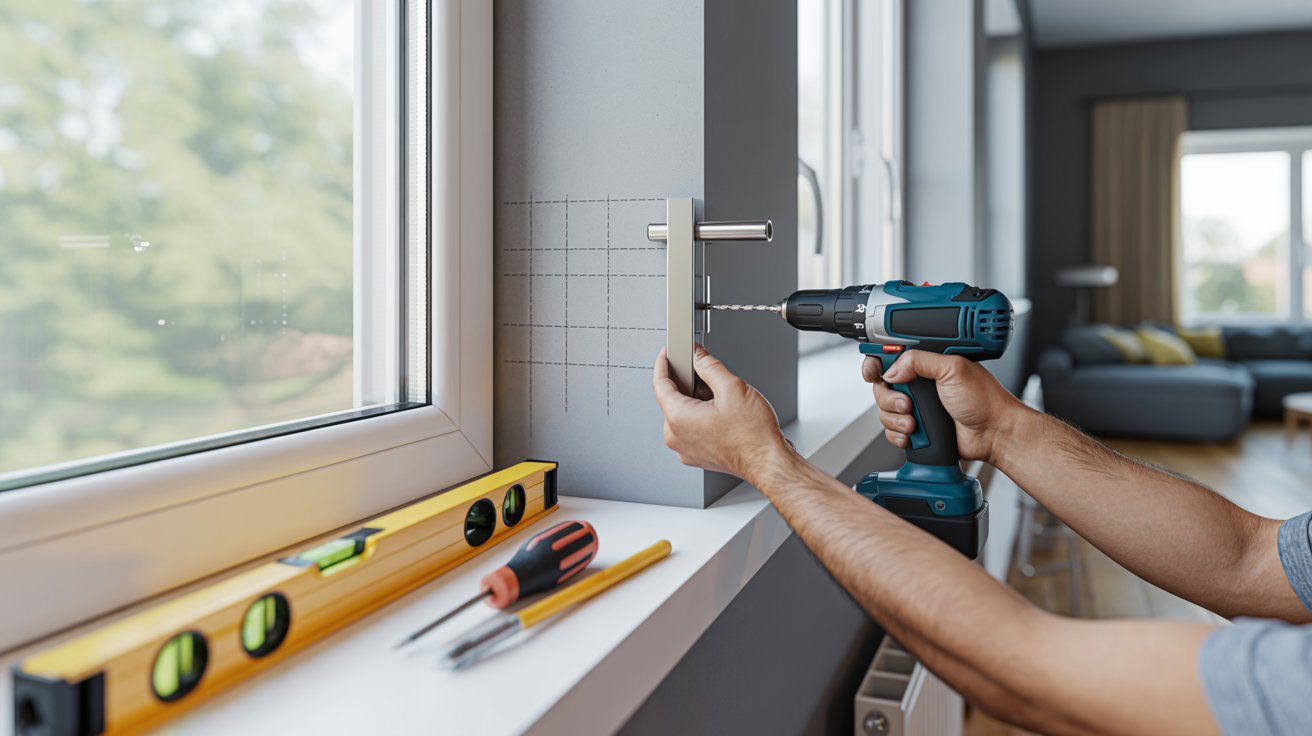
Proper installation keeps your curtains straight and secure for years.
Mount the rod 4 to 6 inches above the window frame. Going higher makes the window look taller and lets in more light.
Mark where each bracket will go using a pencil. Hold the bracket against the wall and mark the screw holes before drilling.
Drill pilot holes and insert wall anchors if needed. Screw brackets in firmly, then use a level to confirm the rod sits straight.
Step 5: Hang the Grommet Curtains

This is the easiest part once the rod and brackets are in place.
Remove the finials from both ends of the rod and set them aside safely before threading the curtains.
Thread the rod through each grommet ring one by one. Make sure all rings face the same direction so folds line up evenly.
Place the rod back onto the brackets and reattach the finials on both ends to hold everything in place.
Step 6: Adjust Curtains for Perfect Pleats

Small adjustments after hanging make a big difference to the overall look.
Space the folds evenly between each grommet ring by hand. Even folds give the curtains a neat and finished appearance.
Slide both panels equally on either side of the window to keep it balanced and looking well put together.
Overlap the panels by 2 to 3 inches in the middle to block gaps and stop light from coming through when closed.
Styling Tips to Make Grommet Curtains Look Better
Give your curtains a fresh, finished look with a few simple styling choices that work for any room.
- Layer grommet curtains over sheer panels to get both privacy and soft natural light during the day without blocking the window completely.
- Use tiebacks or holdbacks to pull the curtains to the side, giving the window an open and well-framed look when needed.
- Pick heavier fabrics like velvet or linen for bedrooms where you want more light control and a warmer, cosier feel.
- Choose light, neutral colors for smaller rooms to keep the space feeling open and bright without the curtains taking over.
- Go for solid colors or simple patterns if your room already has busy furniture or bold wall colors, so everything stays balanced.
Conclusion
Hanging grommet curtains is honestly one of the easier home updates you can do yourself.
Measure your window, pick the right rod, prep your curtains, fix the brackets, thread the rings, and adjust the folds. That is really all it takes.
Grommet curtains are practical, low-maintenance, and suit almost every room. Once you hang them yourself, you will see how simple it is.
Give it a try this weekend and share how it went in the comments below!
Frequently Asked Questions
Can I hang grommet curtains without a drill?
Yes, you can use adhesive hooks or a tension rod for lightweight curtains. However, a drill gives a stronger and more secure hold for heavier fabrics.
What size curtain rod fits grommet curtains?
Most grommet curtains fit rods between 1 and 1.5 inches thick. Always check the grommet opening size before buying a rod to make sure it slides through easily.
How high should I hang grommet curtains above the window?
Mount the rod 4 to 6 inches above the window frame for the best look. Going higher makes the ceiling appear taller and the window look larger.
How do I keep grommet curtains from sliding to one side?
Use rubber rod grips or small curtain ring clips to hold the panels in place. Spacing the grommets evenly when hanging also helps keep them from shifting.
Can grommet curtains be used in a bathroom or kitchen?
Yes, but choose moisture-resistant or washable fabrics for these areas. Avoid heavy materials that hold moisture, as they can develop mold or mildew over time.


